EQUIPMENT AND THE DISTRIBUTION OF WATER AND AIR
Tanks
The focus of every hatchery is the larval rearing tank. Many different types of containers can be used to grow freshwater prawn larvae, including circular flat-bottomed tanks (made from plastic or converted from large-bore drain pipes), circular conical-bottomed (sometimes called cylindrico-conical) plastic tanks, plastic-lined wooden tanks, rectangular concrete tanks, concrete-faced brick or block tanks and earthenware water jars (known in Thailand as ‘klong pots’ – see Annex 4, Figure 4). There are some advantages in having rectangular tanks. Circular tanks are acceptable, but once you increase the capacity of the hatchery you would need a lot of small tanks or a few very large ones. Large circular tanks are rather cumbersome to use.
If you use a lot of small circular tanks you will waste a lot of space between them and you would need a lot of unnecessary pipe fittings, etc. The main advantage of rectangular tanks is that you can build them so that the width stays the same, whatever the volume, while the length increases as they get bigger.
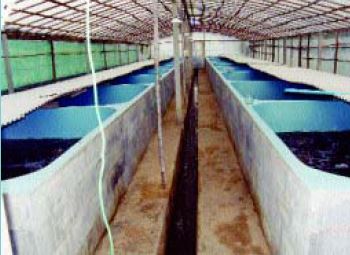
Figure 15
Partially covered larval tanks, made from concrete blocks (Thailand)
SOURCE: HASSANAI KONGKEO
A 10 m3 rectangular tank is just as accessible for feeding, cleaning and larval inspection as a 1 m3 rectangular tank.
Suitable materials for tank construction vary
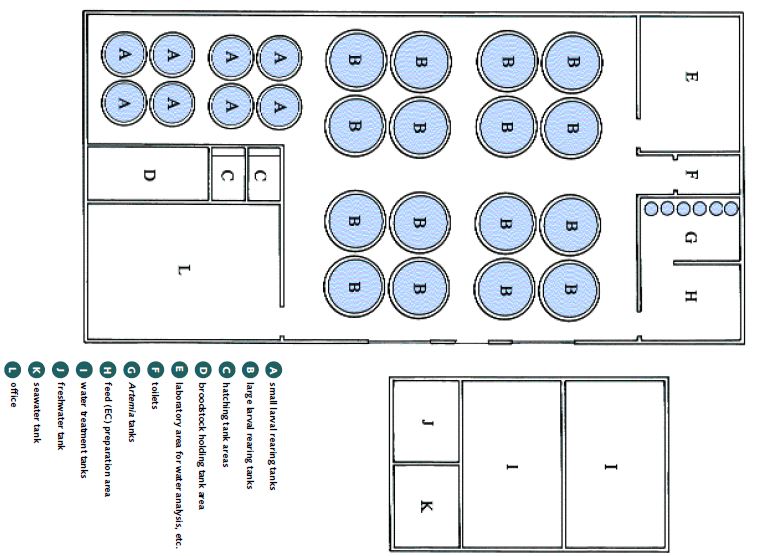
FIGURE 16
Hatchery layout is site specific; this is one example
SOURCE: EMANUELA D’ANTONI
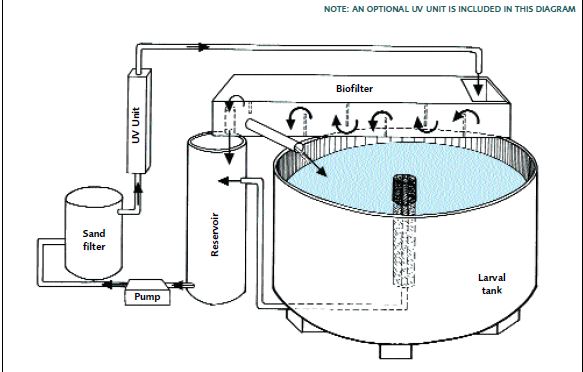
FIGURE 17
This shows the water flow through a freshwater prawn hatchery recirculation system
SOURCE: EMANUELA D’ANTONI, DERIVED FROM VALENTI AND DANIELS (2000)
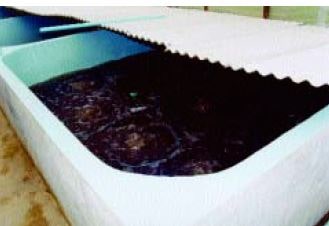
from site to site. Copper and zinc (and their alloys), galvanized steel, bare concrete, and oil are toxic to larval freshwater prawns. These materials must be avoided when tanks are constructed and equipment, such as pipes, water and air pumps, etc. are bought. Rigid plastic, fibreglass or plastic-lined wooden tanks are ideal. The original ‘Hawaiian’ freshwater prawn tanks were based on a fibreglass interior, with a reinforced layer of concrete ‘shot-creted’ onto the outside for strength. Tanks can be made from good quality concrete or concrete-faced hollow-blocks which should be reinforced with vertical iron rods. Tanks based on concrete blocks, lined with a smooth concrete surface and coated with several layers of pure epoxy-resin to prevent harmful chemicals leaching out of the concrete, are very successful (Figure 18).
Figure 18
There can be a lot of wasted space around circular tanks but none is wasted between these rectangular larval tanks (Thailand)
SOURCE: HASSANAI KONGKEO
Some people report that concrete struct u r e s o f t e n c r a c k and need to be re-coated with epoxy-resin (which is expensive) but this may be because of poor construction when they were first built. These tanks must be carefully constructed so that they do not leak. They must have a firm, well-compacted foundation (a 5 m3 tank, for example, supports 5 mt of water, plus its own weight). Concrete pouring or facing work must be continuous so that the concrete does not dry out by sections. Failure to do this will later result in cracks and leaks at the joints. Place your larval tanks high enough so that you can drain them by gravity when the turn-down drain is operated. Construct tile, faced block or concrete drainage canals to carry the drained larval rearing water away without undermining the foundations of the tanks. Another argument against concrete tanks is that they are ‘permanent’ immovable structures. Plastic or fibreglass tanks can be purchased ‘off-the-shelf ’ and can be rearranged if you want to revise the layout of your hatchery.
However, buying plastic tanks can be very expensive and many commercial freshwater prawn hatcheries stick to concrete-lined or concrete tanks.
Whatever type of tanks you choose, you must ensure that they have a smooth surface and that all right-angled parts (where the side walls join and the bottom meets them) are ‘rounded off’ (see Figure 18). This is essential to make efficient tank cleaning easier and to reduce the surface area available for the growth of algae, bacteria and protozoa.
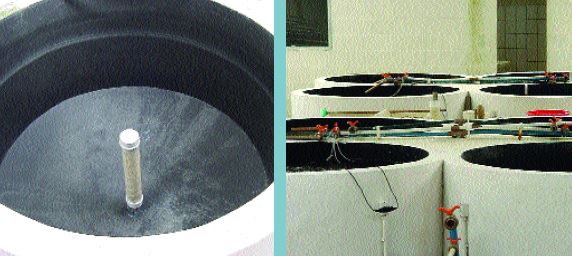
Smooth surfaces also decrease the tendency of larvae to concentrate in the corners of the tank. Circular tanks avoid this problem but some hatchery operators find that food distribution and tank cleaning operations are more difficult in circular than in rectangular tanks, because of the difficulty of moving between them in a limited space. Some hatchery operators prefer cylindrico-conical tanks because they find them easier to clean. Figure 19 shows an interior view of this type of tank. The difficulties which hatchery operators have in working around a lot of circular tanks can be reduced by building them in groups, as illustrated in Figure 20. There are obviously many possible alternative choices of tank construction and layout. You must make your own choices; this manual can only point out some of the advantages and disadvantages of each type. Whatever type of tanks you choose, it is essential that you ‘age’ them when they are new by soaking them in several changes of brackishwater for several weeks. This allows soluble toxic materials to leach out.
Many hatchery managers believe that tanks with coloured (green, blue, black) interiors seem to give better results and there is some research evidence for this. You will note that the tanks shown in Figures 19 and 20 are painted black. Some speculate that the larvae can see their food more easily and are better distributed throughout each tank.
However, not all successful hatchery operators agree. Some claim that larvae find their
Figure 19
Inside of cylindricoconical larval tank, showing the central standpipe used during water exchange (Brazil)
Figure 20
Some space can be saved by grouping tanks together but there is still some ‘dead’ space between these cylindrico-conical hatchery tanks (Brazil)
SOURCE: EUDES CORREIA SOURCE: EUDES CORREIA
food mostly by contact, not sight, and that white tanks make it easier to clean and observe the larvae! The tanks shown in Figure 18 are painted light blue, which seems to be a compromise.
Another operator has found that painting the bottom and the lower 30 cm of the tank sides beige and leaving the rest of the tank black provides the best colour contrast to Artemia and allows the larvae to feed more efficiently in indirect light. It is therefore not possible to make a firm recommendation on tank colour in this manual (further research may make a clear recommendation feasible in the future). Individual hatchery experience, based on ease of management, observations on the larvae, and (most important of all) success in producing healthy PL in the shortest time and with the best survival rate, is what governs the choice of colour at present.
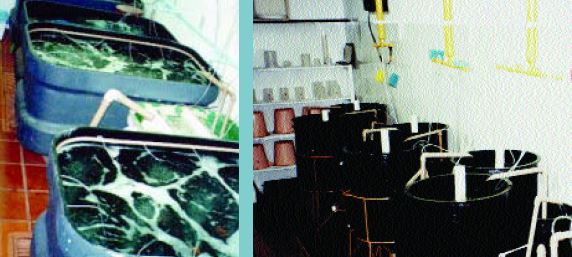
Figure 21
The water in these larval tanks recirculates through a shared filter (Brazil)
Figure 22
These larval rearing tanks have individual recirculation systems (Brazil)
SOURCE: WAGNER VALENTI SOURCE: WAGNER VALENTI
Individual tank size depends on the number of larvae you want to stock and on whether you find that operating a few larger tanks or a lot of small ones is most convenient.
In recirculation systems, individual larval tank size generally varies from 1-8 m3 and the filters can either be shared (Figure 21) or individual (Figure 22). Tanks of between 2 and 5 m3 are typical in flow-through systems but some hatchery operators prefer larger tanks (e.g. 10 m3). Some hatcheries use a range of tank sizes, so that the larvae can be reared in high densities in small tanks at the beginning (which conserves water and food, and makes management easier) and moved to larger tanks later when they require more space. Other hatchery managers think that the apparent advantages of this style of management are outweighed by the larval damage and mortalities caused during tank transfers.
For illustrating some management techniques and calculations of water requirements, etc., a standard tank water volume of 5 m3 has been used in this manual.
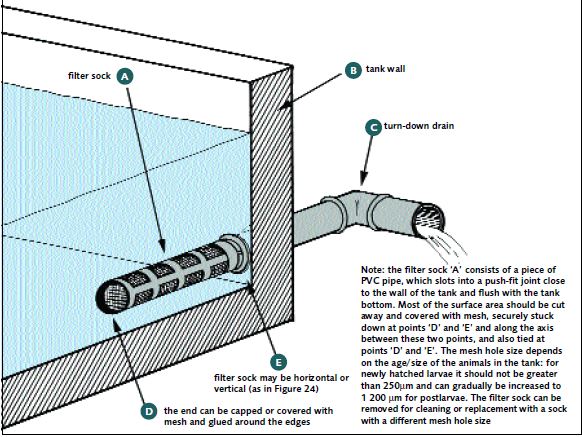
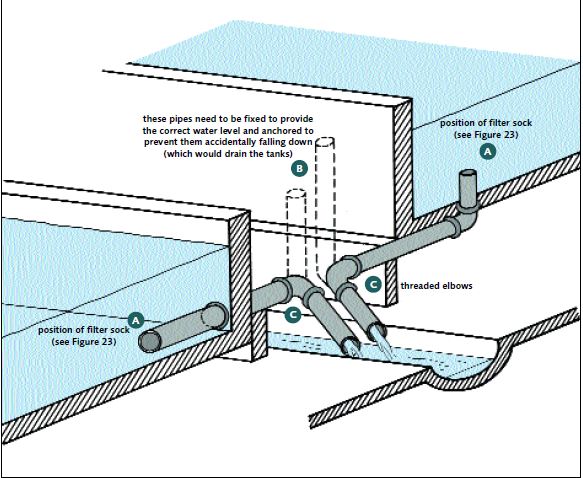
Good tank drainage is essential. You have to remove water (during water exchange) and, at harvesting time, PL from your tanks. The interior draining system in a cylindricoconical tank is clearly shown in Figure 19. If rectangular tanks are used it is essential to slope them slightly toward the drain end. Use a 2 inch (5 cm) turn-down drain for a 5 m3 tank. Larger tanks will need larger bore drainage pipes (e.g. 4 inch – 10 cm – for a 10 m3 tank). Smaller tanks can use smaller pipes for drainage but it is important not to make the drainpipes too small or water exchange will take too long. These pipes must be covered with a filter sock inside the tanks made of nylon screen (Figure 23) to prevent the loss of animals during water exchange operations. They can be arranged so that they drain into
FIGURE23
Whatever kind of hatchery tank drain you use, it needs to be protected by a filter sock to prevent the loss of larvae during water-changing operations
SOURCE: EMANUELA D’ANTONI
a central channel, as shown in Figure 24. You will need to use a mesh size of 150-250 μm at first, because the larvae are so small. However, this mesh size drains slowly and you must increase it as the animals grow. By the time you have PL in the tanks you can use a mesh size of 1 000-1 200 μm. The filter sock is removed during harvesting operations.
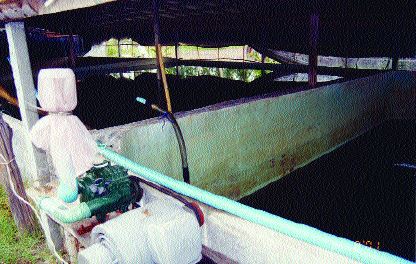
You will also need other types of tanks besides larval tanks. For example, tanks for hatching live feed organisms (e.g. Artemia) are required. Mixing tanks are also needed for preparing the brackishwater to be used in the hatchery, as well as storage tanks for seawater or brine and freshwater (Figure 25). Building mixing and storage tanks high enough so that the water for tanks can be distributed by gravity would seem ideal. However, the cost of constructing raised tanks is so high that pumping is normally used for this purpose, as shown in Figure 25. Your hatchery should have a total storage, holding and mixing capacity of at least twice the total volume of its larval rearing tanks (e.g. four 25 m3 or two 50 m3 tanks for every ten 5 m3 larval rearing tanks). This capacity is necessary to allow for adequate water storage, treatment and mixing time for the production of 12 ppt brackishwater.
You will also need to provide tanks for holding PL before sale or stocking in nursery or grow-out facilities. The type, size, and shape of materials used in the construction of water storage and supply systems, as well as for postlarval holding tanks, vary according to the site and scale of operations, like the larval tanks. Some tropical hatcheries find that
FIGURE24
Turn-down drains are the best way of changing water or harvesting hatchery tanks
SOURCE: EMANUELA D’ANTONI
Figure 25
Tanks for storing hypersaline water and freshwater, and for mixing purposes at an inland hatchery in Thailand; note the roof and side covers for excluding aerial pollution and controlling temperature
SOURCE: HASSANAI KONGKEO
a convenient size for PL holding tanks is 25 or 50 m3 but your choice will depend on the number of larval tanks you operate per production cycle.
Air supply
A vigorous supply of air is essential in all your tanks (larval, Artemia rearing, mixing, storage), to keep the dissolved oxygen (DO2) levels high (>5 ppm). The relationship between temperature, salinity and dissolved oxygen saturation levels is shown in Table 7. In the larval tanks, aeration also keeps the larvae in close contact with their food. Some hatcheries distribute air through several rigid 0.5-1.0 inch (1.25-2.5 cm) diameter PVC pipes (1.25 cm pipes work best in circular tanks) with holes cut into them at 0.3-0.5 m intervals with a 1/32 inch drill. Others use weighted flexible plastic tubing laid on the bottom of the tank, with holes punctured in them. However, the use of good-quality air stones is preferable
TABLE 7
Relationship between temperature, salinity and dissolved oxygen saturation levels (in ppm)
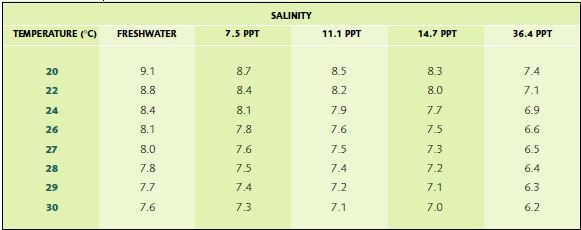
SOURCE: DERIVED FROM SPOTTE (1970) USING KNUDSEN’S FORMULA FOR CONVERTING CHLORINITY TO SALINITY
preferable because the holes in pipes and flexible tubing easily become blocked. In addition, pipes or tubing on the tank bottom hide detritus, providing conditions favourable for the growth of fungi and protozoa, and making tank cleaning extremely difficult. Airstones are therefore recommended; punctured pipes or plastic piping within the larval tanks are not.
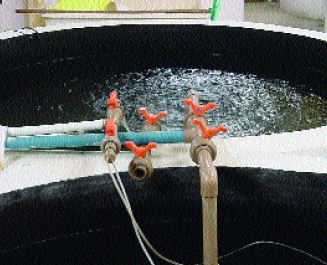
Make sure that the flow of air in one tank is not affected by the number of other tanks in operation or by the operation of valves in an adjacent tank. You can do this by having a large bore 2 or 3 inch (5 cm or 7.5 cm) ring main distribution system (Figure 26) with smaller 0.5 inch (1.25 cm) or 1.0 inch (2.5 cm) pipes supplying each tank, each controlled by an individual valve (Figure 27). The blower should be sized to provide more air than needed (see below) and excess air can be voided through a valve on the ring main, which can be adjusted according to the day-to-day requirements of the hatchery.
The aeration system is a vital part of the hatchery, so it is important that you protect it from damage. The distribution system can be buried for protection against accidental damage by placing it under 4 inches (10 cm) of medium gravel or sand, whether the hatchery is indoors or out-of-doors. Covering any type of hatchery pipe work with concrete is not recommended. An alternative, which is probably preferable, is to suspend the aeration system from the hatchery roof and to drop individual supplies to each tank (see Figure 38). Within larval tanks, air needs to be well distributed, so that it not only keeps the oxy-
FIGURE26
Installing a ring main air supply system using larger bore piping than you use to connect the main to each valve helps you to ensure that each tank receives the amount of air you wish it to have
SOURCE: EMANUELA D’ANTONI
gen level in the whole tank high but also keeps the larvae close to their food. Distribute the air within your larval tanks by air stones (roughly placed at one per m2 of tank bottom.
Internal aeration in tanks used in recirculation systems, in addition
Figure 27
Close-up of taps for brackishwater, freshwater and air supplies to larval tanks (Brazil)
SOURCE: EUDES CORREIA
to maintaining dissolved oxygen levels high, must be placed so that it generates water circulation from the centre of the tank to the sides and from the top to the bottom. If this is not done, it will cause ‘dead spots’ in the tank, where larvae and feed drop out and are trapped near the bottom, and solid wastes will not be removed for treatment in the filters. Failure to tackle this topic will result in an excessive build-up of bacteria, causing water quality and disease problems.
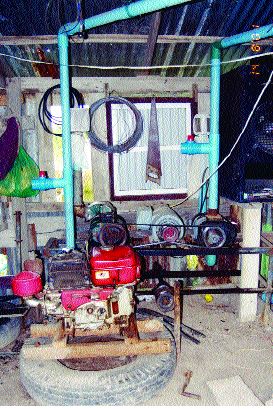
An oil-free blower (Figure 28) is better than an air compressor for hatcheries, because it gives high volume, low pressure, uncontaminated air. The high pressure provided by an air compressor is not normally needed, except for flushing filters in recirculation systems. Approximately 0.3 CFM (0.55m3/hr) of air for each cubic metre of water should be available. A 200 CFM (5.66 m3/min) Roots-type or similar blower is sufficient to supply air for a hatchery capable of producing 20 million larvae/year. You must keep a spare blower and motor in working order at all times. You should rotate the use of the blowers regularly. Do not always operate one and hope that the other one will work when you need it in an emergency. You should also check that both blowers are in working order once per day. Your spare blower must be permanently plumbed and wired in so that it can be switched into the system immediately if a failure of the other blower should occur. Two forms of back-up (against pump failure and power failure) are illustrated in Figure 28. A pressure drop sensor can be built into the air distribution system, which will switch the emergency blower on automatically if the main one fails but this is uncommon in most freshwater prawn hatcheries, which rely on vigilant workers (during the night as well as the day) and power failure alarm systems for safety.
Water distribution
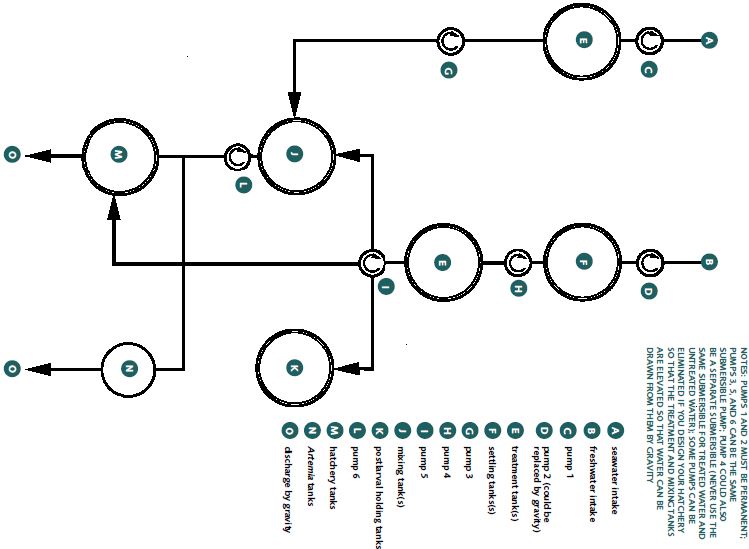
Water distribution systems within hatcheries vary widely. Many hatcheries are built with elaborate and permanent distribution systems providing an individual supply of piped seawater, freshwater and brackishwater to every tank, as shown in Figure 27. An example of a water distribution layout for a flow-through hatchery is shown in Figure 29. In some commercial hatcheries these cease to be used after a while; there is a tendency for water quality to deteriorate because it may have lain stagnant in the pipes for some time. Such sophisticated water distribution systems can be replaced by flexible tubing and submersible pumps. Submersible pumps are easy to use if the hatchery is compact, but if you use them without care it may result in contamination between untreated and treated water supplies, and possible disease transfer between one rearing tank and another.
Figure 28
Power supplies are not always reliable.
Loss of aeration can quickly cause devastation in a hatchery. This hatchery has not only installed two electrically-driven blowers (one as a back-up) but has also provided a petrol engine so that the drive belts can be rapidly changed if the power fails (Thailand)
The individual tank water inlets can be arranged so that they can be turned away from the tank and water can be flushed to waste before it is directed into the tank. This prevents water from entering the larval rearing tanks that may be stagnant or very warm because it may have come from pipes exposed to sunlight. Another way of ensuring that this cannot happen is to fix a short length of flexible hose to each water inlet and always allow the water to flush to waste for a minute or two before letting it flow into the tank.
The choice of pump size depends on the scale and design of each specific hatchery. As noted earlier, specific hatchery design is not a part of this manual. In sizing, pumps should be chosen which will fill the appropriate tank at the maximum rate required, not the average rate. There is nothing more annoying than a slow-filling tank due to pump under-sizing.
Copper and zinc are toxic to freshwater prawns but there should be no problem in the use of pumps containing alloys of these two metals (which are often chosen, particularly for seawater pumping, because of their corrosion resistance) where the water passes through the pump only once. Pumps which are submerged in water (submersible pumps), or which form part of recirculation systems, must have those parts in contact with water made of an inert material, such as plastic. Air lift pumps (see Figures 13a and 13b) are also extremely useful for recirculating water or for transfer of water from one tank to another. In all cases, pump sizes should be standardized as far as possible to minimize the number of standby pumps necessary. Make sure that you can replace an outof- order pump simply and quickly and keep adequate spares in working order on site at all times.
Maintaining equipment such as pumps, blowers and generators in good general working condition is critically important. These items should have a weekly functional check.
In recirculation systems, proper water flow rates and good circulation is essential for adequate waste removal. All equipment must be capable of supporting the maximum water flow rate needed during the larval cycle.
Ideally, the total water volume in the larval rearing tanks should circulate through the filter an average of at least 10 times per day (1 000%) but pump sizing should be based on the maximum flow demand. When the larval stocking rate is high, the water may need to be passed through the filter at a turnover rate of 70 to 100% per hour. Thus a 5 m3 larval culture system would require a system capable of providing a water flow of 5 m3/hour. This can best be done through the use of airlift pumps (see Figures 13a and 13b). All pumps, filters and disinfection systems must be sized to provide this maximum flow rate. Useful information on pumps and pumping for aquaculture is given in Wheaton (1977).
FIGURE 29
The water distribution and treatment system is site specific; this is one example
SOURCE: EMANUELA D’ANTONI
Water discharge
You should take care to see that water discharged from your hatchery does not contaminate the incoming sources of hatchery freshwater and seawater. This is particularly important where surface sources of water are utilized. In a coastal hatchery using surface seawater, tidal and current characteristics should be taken into account in determining the locations of the intake in relation to the farm effluent discharge. Where surface freshwater is taken from a river the farm effluent should be discharged well below the water intake point. Do not discharge water containing chemicals, such as heavy loads of chlorine for equipment disinfection, into open waters.
Light
The ‘greenwater’ larval rearing system, which has generally fallen out of favour in commercial hatcheries in the past decade, obviously required light. The phytoplankton bloom in those systems provided shade for the larvae and helped to maintain good water quality.
Nowadays, almost all freshwater prawn hatcheries operate a ‘clearwater’ system. You should not expose larvae to direct sunlight, which appears to be harmful. It is therefore recommended that 90% of the surface of ‘clearwater’ flow-through tanks kept outdoors should be covered. The material used to cover the tank can be whatever is locally and cheaply available, provided it does not disintegrate when exposed to sunlight, heavy rain or strong winds. This prevents the growth of phytoplankton and reduces the incidence of what Takuji Fujimura referred to as ‘skin cancer’.
Some outdoor backyard hatcheries completely cover their hatchery tanks with black tarpaulin to prevent the spray generated by the aeration in neighbouring tanks transferring disease organisms. Most hatchery managers insist that some light, especially natural light, is essential for good larval survival; they therefore provide transparent roofs to their hatcheries but partially cover their tanks with asbestos or plastic sheeting to keep light to a minimum (see Figure 18). Natural light can be replaced by artificial sources (tungsten or special blue-black fluorescent tubes) which contain the near-blue (non-toxic) ultraviolet wavelength. Successful rearing has been reported at light intensities varying between 250 and 6 500 lux. However, a level of 250-800 lux is recommended for commercial hatcheries.
Natural light is preferable but you can use artificial light to increase the intensity on cloudy days and to extend the day length. Excessive growth of algae tends to foul the biofilters in recirculation systems and you should shade these filters, while providing indirect light to the culture tanks themselves.
Filters
Two types of filtration equipment are used in hatcheries, physical and biological. Physical filters remove the solid wastes, mainly faeces, uneaten feed and bacterial debris. Biological filters, sometimes called biofilters, are essential components of recirculation systems for freshwater prawn hatcheries. They remove the ammonia excreted by the larvae and live feeds, as well as that formed by the decomposition of organic matter. In these filters, ammonia is converted first to nitrites and then to nitrates. Some physical filtration occurs within biofilters. Solid wastes are also removed during daily tank siphoning.
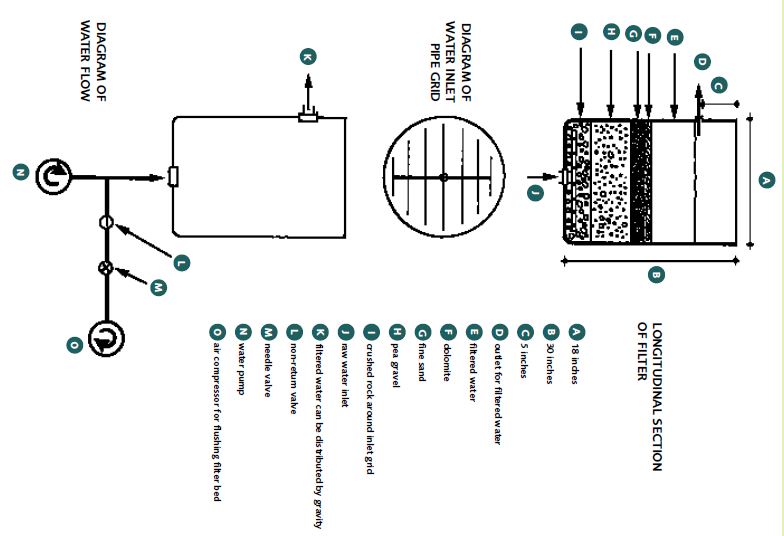
Physical filters include sand filters, drum screen filters, and expanded media filters (e.g. bead filters). They can be either up-flowing (Figure 30) or down-flowing but need to be easy to clean and should be designed to minimize water losses in the system. Sand or bead filters may be adequate for freshwater prawn hatcheries. However, drum screen filters do not clog so much and have an automatic backwash. In sand filters a particle size of 850 μm
FIGURE30
The water in physical hatchery filters may flow upwards or downwards; this illustrates an upward-flowing filter
SOURCE: EMANUELA D’ANTONI, AFTER NEW AND SINGHOLKA (1985)
is recommended. The volume of these filters needs to be calculated so that they can cope with the volume and flow rate of the specific recirculation system you propose to run.
Physical filters are typically placed in the system before the UV units (if used) and the biofilters, for maximum efficiency. They need to be flushed on a regular basis (at least once a day) to prevent them becoming blocked up with organic material and becoming potential sources of pathogenic bacteria. Sand filters can be backwashed with freshwater and air to save on brackishwater (this is especially important when artificial seawater is used). If water is going to be passed through UV units, substantial particle reduction is required to reduce the amount of suspended matter, thus improving the efficiency of this form of water treatment. UV treatment is uncommon in freshwater prawn hatcheries but future research may demonstrate whether its use would be advantageous.
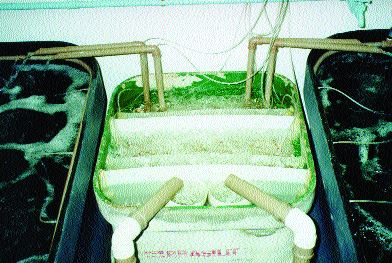
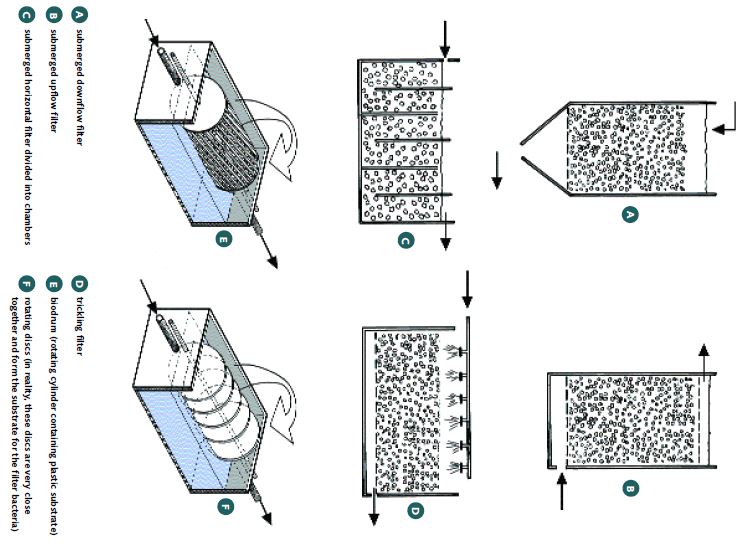
Biological filters are essential in recirculation systems (Figure 31). There are several types of these filters (Figure 32). Submerged biofilters are efficient, simple, and cheap. The type that is horizontally divided into chambers (as shown in Figure 31) seems to be the most efficient. Biofilters require aeration to maintain enough dissolved oxygen to supply the nitrifying bacteria. It is recommended that the biofilters in a recirculation hatchery for freshwater prawns should have a volume equivalent to about 10% (range 4-20%) of the total tank volume. Crushed oyster shell, dolomite [CaMg(CO3)2], or coral (5 mm particles) is suggested as the filter medium (this provides the surface area where the nitrifying bacteria live).
There is a tendency for the water in recirculation systems to become acidic (the pH value falls) but calcareous media contain an inexhaustible source of buffer material (carbonate and bicarbonate ions), which slowly dissolves into the water. However, plastic filter media, which have no buffering capacity, are often used in biological filters. This is because they are easy to handle and are supplied in shapes and particle sizes which mazimize the surface area available to the nitrifying bacteria. Recirculation systems using plastic media may eventually need buffering by the addition of sodium bicarbonate (NaHCO3) or sodium carbonate (Na2CO3) to the water to maintain its pH at 7.0-8.5. Using a calcareous filter media avoids this problem. Placing the filter medium in plastic or nylon bags makes handling easier. It has been estimated that a system rearing 2 million larvae would require about 500 kg of crushed coral within the biofilters once the larvae reach a maximum biomass. This can be modified according to the specific scale of hatchery operations.
Biofilters need to be ‘activated’ before use. This means an initial bacterial inoculum needs to be added to the larval rearing system to reduce start-up time; the bacteria will
Figure 31
Close-up of a biological filter shared between two larval tanks in Brazil, showing the water entering the mechanical filters (foreground), from where it passes through the biological filter and exits back to the two tanks by means of simple airlift pumps
SOURCE: WAGNER VALENTI
FIGURE 32
There are many types of biological filters for hatchery recirculation systems; these are the most common types
SOURCE: EMANUELA D’ANTONI, DERIVED FROM NEW AND VALENTI (2000)
then multiply to cope with the nitrogenous load in the water of the system. The bacterial inoculum can come from another operational filter or from a separate pre-conditioning tank, which is run at the same temperature and salinity as the larval culture tank. Further details on biofilter activation, derived from Valenti and Daniels (2000) are given in Box 5.
The filtration technology used in marine fish and shrimp hatcheries is generally more sophisticated than the methods described above. The application of these techniques to freshwater prawn hatcheries may prove beneficial in future. Detailed information on these systems is available in Van Wyk et al. (1999) and Moretti et al. (2002).
Miscellaneous equipment
Many items of small equipment are essential in every hatchery. These include, for example, buckets, epoxy-resin paint, weighing scales, fibreglass repair kits, nets, tools, nylon and cloth mesh, brushes, flexible tubing, postlarval transport equipment (bags, tanks, portable air supply, etc.) spares for electrical equipment, disease prevention drugs and chemicals, spares for PVC pipe work and valves, kitchen equipment for feed preparation, refrigerator, stereoscopic microscope (with a magnification range of 40 times), refractometer (for measuring salinity), pH meter, heaters, beakers, glass jars, various chemicals, etc.
All equipment needs to be suitable for use in seawater and free from potential contamination from the leaching of metals such as copper, brass, or zinc.
BOX 5 Activating biofilters
ACTIVATION IS A step-wise procedure that may begin with an inoculation, using water or media from an existing system, or can start from scratch. Initially, add 10% of the total ammonia that you expect to be generated in your larval system to the water containing the substrate material in the form of ammonium chloride (NH4Cl) or another inorganic source. When this amount is consumed by the bacteria (as evidenced by the reduction in total ammonia in water samples), add the same amount of ammonia again. Repeat the process until the bacteria are able to convert all the ammonia into nitrate within a 24 hour period. Then add double the initial amount of ammonia and repeat the process.
Keep adding ammonia, monitoring the removal of ammonia and doubling the amount of ammonia added until your biofilter can cope, within a 24 hour period, with the maximum amount of ammonia expected to be generated when there are larvae in the tanks. Once that maximum bacterial load is achieved, the production cycle can begin.
The bacterial population on the media needs to be maintained at the maximum level of ammonia and nitrite consumption. Addition of media to the biofilter should coincide with the increase of NH3-N produced by an increase in the larval biomass. Beginning 3 days poststocking, increasing amounts of ‘activated’ media must be added daily to the biofilter tank. The bacterial population provided through daily addition of media should always be sufficient to remove all ammonia and nitrite.
When the larval cycle is complete, remove all the biofilter media, thoroughly rinse it, and either store it dry or return it to the pre-conditioning tank to re-establish and maintain the bacterial colony.
Alternatively, the substrate can be chlorinated to kill all bacteria, de-chlorinated, and then re-seeded with stock bacteria from another pre-conditioning tank.