4 Source, hatching and enrichment of Artemia
THERE HAVE BEEN many publications on the use of Artemia as a live food since the orig inal FAO manual on freshwater prawn farming was published in 1982. The following annex has been derived mainly from two other FAO publications (Lavens and Sorgeloos 1996; Moretti, Pedini Fernandez-Criado, Cittolin and Guidastri 1999) whose authors are hereby gratefully acknowledged. You are recommended to study these manuals for a thor ough understanding of the topics in this annex.
1. Sources, quality and use of Artemia cysts for freshwater prawn larvae
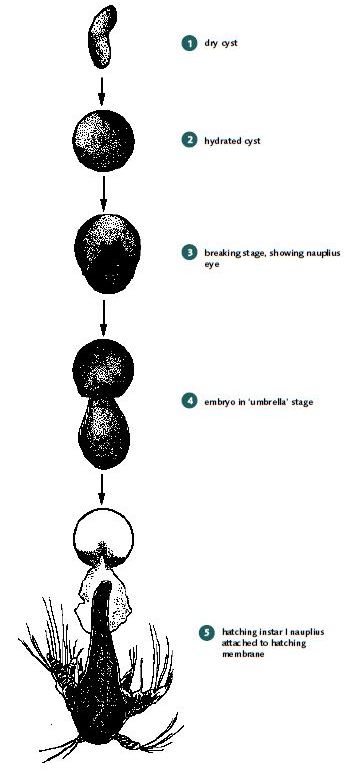
Artemia cysts can be obtained in cans from commercial companies but originate in many different countries, including Brazil, China, Iran, the former Soviet Republics, and Viet Nam. The main source is still the Great Salt Lake in Utah, USA. Dry cysts (2 to 5% moisture) are very resistant to extreme temperatures (hatching viability is not affected in the temperature range -273°C to + 60°C and can even tolerate short exposure to tempera tures between 60°C and 90°C. Hydrated cysts are far less tolerant. Mortalities occur below +18°C and above +40°C, and a reversible interruption of their metabolism occurs between -18°C and +4°C and between +33°C and about +40°C. Active cyst metabolism occurs between +4°C and about +33°C; hatching percentage is unaffected within this range but the nauplii hatch earlier at higher temperatures. When incubated in saline water, Artemia cysts swell up and become spherical within 1 to 2 hours (Annex 4, Figure 1).
After 12 to 20 hours of hydration, the cyst shell bursts (breaking stage) and the embryo, surrounded by the hatching membrane, becomes visible. The embryo then leaves the shell completely and hangs underneath the empty shell but may be still attached to it by the hatching membrane (umbrella stage).
The hatching membrane is transparent and the development of the pre-nauplius into the instar I nauplius, which starts to move its appendages, can be viewed through it. Soon after this, the hatching membrane breaks open (hatching) and the free-swimming larva is born head first. Instar I nauplii cannot feed; thus, the older nauplii are when they are fed to freshwater prawn larvae, the more they will have used up the energy reserves with which they were born and the less nutritional value they will have for the prawn larvae. Instar II Artemia have used up 25 to 30% of their energy reserves within 24 hours after hatching (Merchie 1996). Instar II Artemia are also transparent and swim faster than instar I larvae; they are therefore less easy for prawn larvae to catch. Detailed information on the biology and ecology of Artemia is given in Van Stappen (1996).
ANNEX 4 FIGURE1
Artemia cysts hydrate, break, have an ‘umbrella’ stage, and then hatch
SOURCE: EMANUELA D’ANTONI
FRESHWATER PRAWNS 154
The nutritional quality and physical size of the nauplii which hatch from Artemia cysts (referred to elsewhere in this manual as brine shrimp nauplii – BSN) vary enor mously from source to source and even (in the case of nutritional quality) between indi vidual batches from a single source. Of particular importance is the level of an essential polyunsaturated fatty acid, eicosapentaenoic acid [EPA] (20:5n-3), which depends on the composition of the primary food available to the brine shrimp in the locations where they originate. Further reading on this topic can be found in Merchie (1996). The nutritional quality of Artemia nauplii (BSN) can be improved by enrichment, as described later in this annex. For practical purposes, cysts can be categorized by the size of the first stage nauplii they produce: small (~430 µm), medium (~480 µm) and large (~520 µm) but the size is not so important for freshwater prawns as it is for some marine fish. Freshwater prawns can ingest BSN of all sizes.
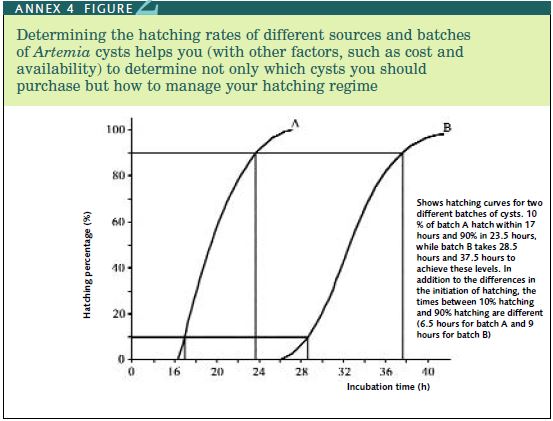
The two other important Artemia factors which vary from batch to batch are the number of cysts per gram and their hatching rate. The most effective way of checking the basic quality of the cysts you buy is to measure the hatching efficiency, because this is a check not only on the percentage of cysts that hatch but is also a means of judging how much detritus (e.g. empty cyst shells, sand, salt, etc.) that the batch contains. Hatching efficiency is defined as the number of BSN hatched per gram of cysts purchased. Premium quality cysts from the Great Salt Lake should yield about 270 000 BSN per gram of cysts. Smaller cysts (e.g. the San Francisco Bay source) may provide up to 320 000 BSN per gram of cysts. However, some sources yield as low as 100 000 BSN per gram of cysts. Good qual ity cysts should start to hatch after 12-16 hours incubation and all should have hatched by 24 hours (Van Stappen, 1996). This measure of quality is known as the hatching rate (HR). Hatching rate curves for two samples of cysts are illustrated in Annex 4, Figure 2. A pro cedure for determining hatching percentage, hatching efficiency and hatching rate is given in Annex 4, Table 1; this should be used to compare different sources of cysts, so that you know whether you are getting value for money or not.
Choosing to feed prawn larvae with 24 hour old or with 48 hour old (timed from when the cyst incubation process starts) BSN depends partly on the rate of Artemia hatching (characteristic of the source and the environmental conditions you supply it with) and part ly on operator preference. Some hatcheries use 24-36 hour old BSN; others use 24-36 hour old BSN at first and progress to the use of larger 48 hour or 72 hour old BSN (reared on ‘greenwater’ or rice bran) as the prawn larvae grow. However, the use of 24 hour old BSN enables you to use the same equipment on a daily basis. Keeping BSN longer before using them is more expensive as producing food to rear them needs more equipment.
Artemia cysts need treatment before the hatching process commences to ensure max imum hatching occurs and to maintain healthy conditions in larval rearing tanks. This process is described below.
2. Treatment of cysts before hatching
Artemia cysts are by nature contaminated with bacteria, fungal spores, and other micro organisms, and may be contaminated with organic impurities. The use of BSN which arise from cysts that have not been disinfected can cause health problems in larval rearing tanks; poor water quality and larval diseases (especially those caused by Vibrio spp.) can be introduced when untreated empty shells, unhatched cysts and cyst hatching water are transferred to the larval rearing tanks. The decapsulation process also disinfects the cysts
ANNEX 4 FIGURE2
Determining the hatching rates of different sources and batches of Artemia cysts helps you (with other factors, such as cost and availability) to determine not only which cysts you should purchase but how to manage your hatching regime
SOURCE: EMANUELA D’ANTONI, AFTER VAN STAPPEN (1996)
but has the additional advantages of increasing the hatching efficiency of some batches and reducing the transfer of indigestible matter to the larval rearing tanks.
DISINFECTION
Commercially disinfected cysts may be available on the market but it is safer to apply rou tine disinfection. Simple disinfection can be done by immersing the cysts in a hypochlorite solution (200 ppm active chlorine), according to the procedure in Annex 4, Table 2. The pro cedure for preparing the disinfection solution is given in Annex 4, Table 3. After disinfec tion, some hatcheries remove residual chlorine with sodium thiosulphate but thorough rinsing of the treated cysts is regarded as adequate in others. However, while reducing the risk of contamination, disinfection does not kill all the organisms present in the outer shells of the cysts and is not recommended in this manual. Decapsulation (see below) is a more effective means of obtaining contaminant-free cysts, as well as potentially increasing hatching efficiency.
DECAPSULATION
Decapsulation completely removes the hard shell that encapsulates the dormant Artemia embryos. This process is recommended because:
although cyst shells can be physically removed after hatching non-decapsulated cysts (this is necessary because cyst shells are not digested and may obstruct the larval gut) this laborious process is completely unnecessary if the cysts are decap sulated;
decapsulation improves the energy content of the BSN (which do not waste energy breaking their own way through the shell) and sometimes increases hatchability; and
decapsulation is an efficient means of disinfection.
Decapsulation involves hydrating the cysts, removing the (then spherical) brown shells in a hypochlorite solution (500 ppm active chlorine), washing them and deactivating the remaining chlorine. Decapsulated cysts can be directly hatched into BSN, or filtered and stored in a refrigerator at 0-4°C for a few days before use, or transferred to a saturat ed brine solution for longer storage (up to several months). If stored, they must be protect ed from sunlight because the hatchability decreases when exposed to UV light.
Decapsulated cysts can be dried and fed directly (without hatching). However, this type of food is more appropriate for postlarvae because prawn larvae feed better on a mov ing target; this is one of the primary reasons for feeding them live BSN. Decapsulation involves the use of a source of hypochlorite, usually liquid bleach (NaOCl), and an alkaline product, usually technical grade caustic soda (sodium hydroxide, NaOH), to increase pH to above pH 10. Finally, the residual hypochlorite is neutralized with sodium thiosulphate. Details of the cyst decapsulation process are provided in Annex 4, Table 4 and the prepa ration of the active chlorine solution in Annex 4, Table 5. Commercial bleach varies wide ly in chlorine content, so it is essential to measure the chlorine content of each batch, as detailed in Annex 4, Table 6.
3. Hatching decapsulated Artemia cysts and harvesting nauplii (BSN)
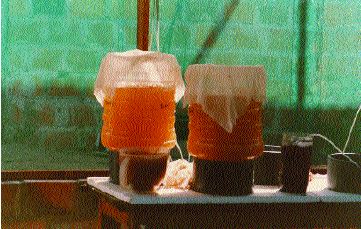
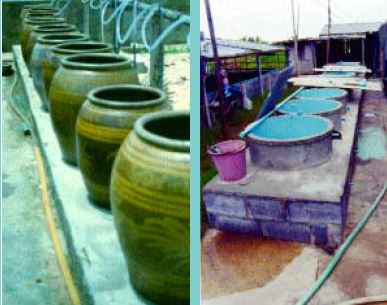
Almost any type of container can be used for hatching Artemia, including rectangular and round tanks, cylindrico-conical tanks, garbage cans, modified drinking water containers (Annex 4, Figure 3), converted chemical carboys, ‘klong’ (water) pots (Annex 4, Figure 4) and other structures (Annex 4, Figure 5). However, several of those types of containers need to be siphoned to empty the BSN out after hatching. The easiest to use is a conical based cir cular plastic or fibreglass tank which is elevated so that the BSN can be harvested by grav ity. A 1 m3 volume tank is convenient. The upper parts of the tank should not be transpar ent; the conical part of the tank can be transparent or translucent and have a valve at the tip of the cone for harvesting purposes. A simple tank is illustrated in Annex 4, Figure 6). Aeration should be supplied through a half-inch PVC pipe which extends to close to the con ical tip of the bottom of the tank; this is to keep the cysts in vigorous suspension, as well as
ANNEX 4, Figure 3
Brine shrimp nauplii (BSN) can be reared in many different containers, including old drinking water bottles (Peru)
SOURCE: OSCAR ORBEGOSO MONTALVA
ANNEX 4, Figure 4
These ‘klong’ pots were being used to culture the larvae of Macrobrachium rosenbergii but are also sometimes used to rear Artemia (Thailand)
ANNEX 4, Figure 5
These outdoor tanks are used to rear Artemia (Thailand)
SOURCE: SPENCER MALECHA SOURCE: HASSANAI KONGKEO
to keep the dissolved oxygen level above 4 ppm. The tanks should be filled with natural sea water that has been filtered and is about 33-35 ppt in salinity (well-buffered artificial sea water can also be used). The optimum hatching temperature is 25-28°C and the best hatch ing pH is 8.0-8.5. A solution of about 1 g of sodium bicarbonate (NaHCO3)/L can be used to achieve this pH level, if necessary. The surface of the water at the top of the tanks should be illuminated at 2 000 lux. If the available sunlight is not sufficient, two 60 watt fluores cent tubes placed just above the tank rim is sufficient to achieve this level of light intensi ty. The hatching tanks should be elevated, to aid the harvesting process.
A one-ton (1 m3) tank can be stocked with 250 g to 1 kg (0.25-1.00 g/L) of Artemia
cysts. The actual amount needed depends on the source of cysts you purchase, and their hatching efficiency (see Annex 4, Table 1). No specific hatching efficiency (HE) is recom mended. Your choice of cysts will be a matter of comparative cost and the results you obtain. Cheap low-quality cysts can be used but you will need more of them. The important thing is that the HE must be measured, so that you know the actual quantity of cysts you will need to obtain the number of BSN you need for your hatchery. A 1 m3 Artemia rearing tank stocked at this level should provide enough BSN to feed ten 5 m3 larval rearing tanks for one day, which are capable of producing 500 000 to 1 million freshwater prawn post larvae per cycle. The hatching and harvesting procedure is given in Annex 4, Table 7.
4. Enrichment
The nutritional quality of BSN, especially in terms of the PUFAs eicosapentaenoic acid (EPA, 20:5n-3) and docosahexaenoic acid (DHA, 22:6n-3) can be increased by enrichment. Enrichment for disease control is also possible. These processes are sometimes known as boosting or bioencapsulation and are a feature in many marine fish and shrimp hatcheries, especially when older BSN are used (Annex 4, Figure 7).
Some advantages from enriching BSN with vitamin C have been clearly demon strated by measuring the reaction of freshwater prawn larvae to stress testing when fed starved versus enriched BSN. Lavens, Thongrod and Sorgeloos (2000) have suggested that the use of HUFA/vitamin C-enriched BSN would provide benefits to hatcheries which do not feed other HUFA- and vitamin-rich supplements (for example, included in EC diets) to larval freshwater prawns from stage V onwards. Several commercial enrichment products are now available and each supplier describes the practical enrichment process. Those Macrobrachium hatchery operators who wish to enhance the quality of their BSN should follow the suppliers’ instructions. The names and suppliers of BSN enrichment products include Super Selco and DHA Selco (INVE Aquaculture NV., B-9080 Lochristi, Belgium), Superartemia (Catvis BV., 5222 AE ‘s-Hertogenbosch, Netherlands) and SuperHUFA (Salt Creek Inc., Salt Lake City, Utah 84104, USA). If you wish to study the topic of Artemia enrichment further, it is recommended that you read the details provided by Merchie (1996).
ANNEX 4 FIGURE
Artemia hatching container during harvesting
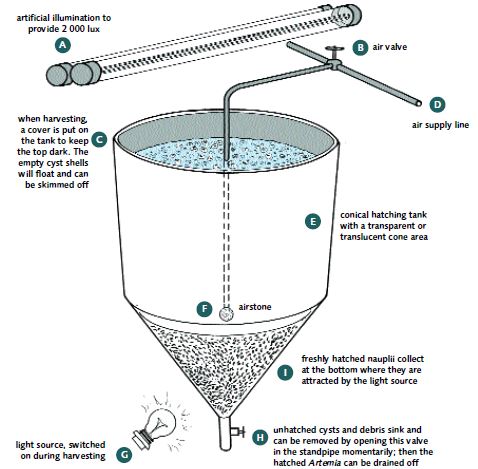
SOURCE: EMANUELA D’ANTONI, DERIVED FROM MERCHIE (1996)
ANNEX 4 FIGURE7
BSN can be enriched to improve nutritional quality and (at least in fish culture) for the control of some diseases
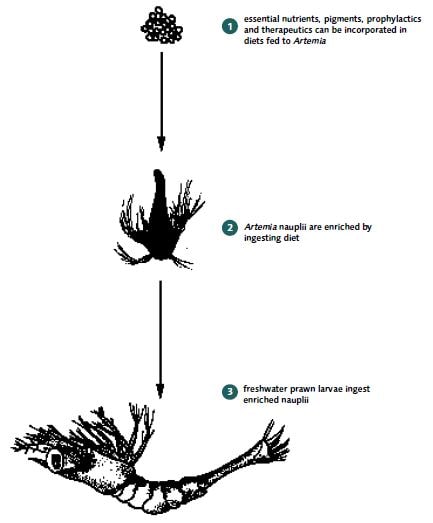
SOURCE: EMANUELA D’ANTONI, DERIVED FROM MERCHIE (1996)
TABLE 1 ANNEX 4
Determining hatching percentage (H%), hatching efficiency (HE) and hatching rate (HR).
1. In triplicate, incubate 1.6 g of cysts14 in 800 ml of 33 ppt seawater under continuous illumination (2 000 lux) at 28°C in cylindrico-conical tubes (preferably) or in graduated cylinders, which are provided with aeration from the bottom sufficient to keep all the cysts in suspension but not so strong that foaming occurs.
2. After 24 hours, take six 250 µl sub-samples out of each tube/cylinder. Pipette each into a small vial and fix the BSN by adding a few drops of lugol solution15.
3. Using a dissection microscope, count the number of hatched BSN in each sub-sample and calculate the mean num ber (N). Also, count the number of umbrella stage embryos16 (Annex 4, Figure 1) in each sample and calculate the mean number (U).
4. Decapsulate the unhatched cysts and dissolve the empty cyst shells by adding one drop of sodium hydroxide solu tion17 and 5 drops of domestic bleach solution18 to each vial.
5. Using a dissection microscope, count the unhatched (orange) embryos in each sub-sample and calculate the mean number (E).
6. Calculate the hatching percentage (H%) for each sub-sample: H% = (N x 100) ÷ (N + U + E). Calculate the mean for each tube/cylinder and determine the mean value and standard deviation of the three replicates. 7. Calculate the hatching efficiency (HE) for each sub-sample: HE = (N x 4 x 800) ÷ 1.6 (which can be simplified to HE = N x 2 000). Calculate the mean for each tube/cylinder and determine the mean value and standard deviation of the three replicates.
8. The hatching rate (HR) can be determined by starting to take sub-samples after 12 hours incubation, followed by new sub-samples every three hours and calculating HE according to the procedure above. Sub-sampling should be continued until the HE becomes constant (maximum HE). Mean values at each sampling time can then be calculat ed and expressed as a percentage of the maximum HE. This enables you to construct a hatching curve (Annex 4, Figure 2) and make comparisons of the hatching rate of different cyst batches.
SOURCE: DERIVED FROM VAN STAPPEN (1996) AND MORETTI, PEDINI FERNANDEZ-CRIADO, CITTOLIN AND GUIDASTRI (1999) TABLE 2
ANNEX 4
Disinfecting19 1 kg of Artemia cysts
1. Prepare 20 L of 200 ppm active chlorine solution (see Annex 4, Table 3).
2. Add 1 kg of cysts and keep them in suspension by vigorous aeration for 20 minutes.
3. Harvest the cysts on a 125 µm sieve and rinse thoroughly with plenty of tap water.
4. Transfer the disinfected cysts into the hatching/incubation tank.
SOURCE: DERIVED FROM VAN STAPPEN (1996) AND MORETTI, PEDINI FERNANDEZ-CRIADO, CITTOLIN AND GUIDASTRI (1999)
14 it is important to use exact quantities of cysts and water, etc., in order to ensure that valid comparisons are being made. 15 lugol solution: Dissolve 50g potassium iodide (KI) and 25g iodine (I2) in 100 ml boiling water (= solution A). Dissolve 25 g sodium acetate (CH3COONa) in 250 ml water (= solution B). When solution A cools, mix solutions A and B and store in a cool dark place. 16 the umbrella stage is when the embryo hangs beneath the empty shell of the cyst, still within the hatching membrane. 17 dissolve 40 g NaOH in 100 ml distilled water.
18 5.25% NaOCl.
19 some of the chemicals used in disinfection and decapsulation are toxic and/or can cause burns. Wear gloves and protective eyeglasses.
TABLE 3 ANNEX 4
Preparing a 200 ppm active chlorine solution for use in disinfecting 1 kg of Artemia cysts
1. Determine the percentage of active chlorine (% Cl) in the commercial liquid bleach or bleaching powder (see Annex 4, Table 6). For this example, let us say that you find that your liquid bleach contains 11.9% Cl and your bleaching powder contains 69.6% Cl.
2. If you are going to use liquid bleach, you need to calculate the quantity of liquid bleach needed in millilitres (A) to obtain 20 L of a 200 ppm solution. First you will need to know the strength of your liquid bleach (see # 1 above). If B is the strength of the solution you want to use in ppm (in this example, 200 ppm), C is the quantity of solution needed in ml (in this example 20 000 ml) and D is the strength of the original bleach in ppm (in this example, we are supposing (see # 1 above) that you have found that your liquid bleach is 11.9% active Cl; this is equivalent to 11.9 ÷ 100 x 1 000 000 = 119 000 ppm active Cl.), the amount of liquid bleach you need to dilute can be calculated as follows: A = B x C ÷ D. In this example, you would therefore need to dilute 200 x 20 000 ÷ 119 000 = 33.6 ml of the this batch of liquid bleach to 20 L with freshwater.
3. If you are going to use bleaching powder, you need to calculate the quantity of bleaching powder needed in grams (A) to obtain 20 L of a 200 ppm solution. First you will need to know the strength of your bleaching powder (see # 1 above). If B is the strength of the solution required in ppm (in this example, 200 ppm), C is the quantity of solution needed in ml (in this example, 20 000 ml) and D is the strength of the original bleaching powder in ppm (in this example, we are supposing (see # 1 above) that you have found that your bleaching powder is 69.6% active Cl; this is equivalent to 69.6 ÷ 100 x 1 000 000 = 696 000 ppm active Cl), the amount of bleaching powder you need to measure out can be calculated as follows: A = B x C ÷ D. In this example, you would therefore need to dissolve 200 x 20 000 ÷ 696 000 = 5.75 g of this batch of bleaching powder in 20 L of freshwater.
4. You now have 20 L of a 200 ppm active chlorine solution, sufficient to disinfect 1 kg of cysts.SOURCE: DERIVED FROM VAN STAPPEN (1996) AND MORETTI, PEDINI FERNANDEZ-CRIADO, CITTOLIN AND GUIDASTRI (1999)
TABLE 4 ANNEX 4
Hydrating and decapsulating20 1 kg of Artemia cysts
1. Calibrate two 20 L plastic buckets: one with a mark at 10 L (bucket A) and the other at 14 L (bucket B). 2. Hydrate 1 kg of cysts in bucket A, making the volume up to 10 L with either freshwater or seawater for 1 hour at 25°C, provided with strong aeration.
3. While the cysts are hydrating, prepare the decapsulation solution (see steps 4-7 below).
4. Measure out the equivalent of 0.5 g of active chlorine (see Annex 4, Table 5) and place in bucket B. If you are using bleaching powder, this must be dissolved in water before step 5.
5. Add 150 g of sodium hydroxide (NaOH) to bucket B if you are using liquid bleach. If you are using bleaching pow der, add 670 g sodium carbonate (Na2CO3) or 400 g of calcium oxide (CaO) instead of the NaOH. 6. Fill bucket B up to the 14 L mark with seawater. Cool the mixture in bucket B to 15-20°C by placing the bucket in a bath of ice water.
7. Provide strong aeration and, if available, antifoam.
8. After 1 hour, collect the cysts from bucket A on a 125µm mesh sieve and transfer them to bucket B. Now the decap sulation process will start.
9. Keep the cysts in suspension (by means of the aeration) for 5-15 minutes. The decapsulation process generates heat, so it is important to keep the contents of bucket B as close as possible within 25-30°C (and never above 40°C, which is lethal for the cysts): add ice, if necessary, to ensure overheating does not occur.
10. Check the decapsulation process under a binocular microscope. The cysts will change colour from dark brown to grey (when you are using bleaching powder), or orange (when you are using liquid bleach). This is the colour of the Artemia nauplii, seen though its outer cuticular membrane. The cysts can also be checked for the level of flotation, using a pipette or graduated cylinder. Non-decapsulated cysts float; decapsulated cysts sink.
11. As soon as decapsulation has occurred (it is essential not to leave the cysts too long in the decapsulation solution, or their viability will be adversely affected), harvest them on a 125 mm mesh sieve and rinse them thoroughly with plenty of tap water until no further smell of chlorine can be detected.
12. Remove the residual chlorine by dipping them in a 0.1% sodium thiosulphate (Na2S2O3.5H2O) solution for about 5 minutes; then rinse them again. [The presence of residual chlorine can be detected by putting a few decapsulated cysts in a small amount of starch-iodine indicator (starch, potassium iodide, sulphuric acid, water): the chlorine has been removed when the reagent no longer turns blue.]
13. The rinsed and decapsulated cysts can either be transferred directly into the hatching/incubation tank or they can be stored.
14. Short-term storage (up to one week) can be achieved by rinsing, draining and keeping the decapsulated cysts under refrigeration (0-4°C).
15. Longer-term storage can be achieved if the cysts are dehydrated by placing them in a saturated brine solution. 10 L of brine (300 g NaCl/L) are needed for each 1 kg of cysts. The cysts will need to be drained and the brine solution replaced once or twice at the beginning. Then the cysts can be stored under brine for a few months when kept in a refrigerator.
SOURCE: DERIVED FROM VAN STAPPEN (1996) AND MORETTI, PEDINI FERNANDEZ-CRIADO, CITTOLIN AND GUIDASTRI (1999)
20 Some of the chemicals used in disinfection and decapsulation are toxic and/or can cause burns. Wear gloves and protective eyeglasses. All decap sulation operations should be carried out in a well-ventilated room. Gloves and protective eyeglasses should be worn.
TABLE 5 ANNEX 4
Obtaining 0.5 g of active chlorine for use in decapsulating 1 kg of Artemia cysts
1. Determine the percentage of active chlorine (% Cl) in the commercial liquid bleach or bleaching powder (see Annex 4, Table 6). For this example, let us say that you find that your liquid bleach contains 11.9% Cl and your bleaching powder contains 69.6% Cl.
2. If you are going to use liquid bleach, calculate the quantity needed to provide 0.5 g of active chlorine in millilitres (A) as follows. First you will need to know the strength of your liquid bleach (see # 1 above). If B is the quantity of active chlorine needed (in this example 0.5 g) and C is the percentage of Cl in the liquid bleach (in this example 11.9%), you can calculate the amount of liquid bleach as A = B x 100 ÷ C. In this example, you would therefore need to measure out 0.5 x 100 ÷ 11.9 = 4.20 ml of liquid bleach.
3. If you are going to use bleaching powder, calculate the quantity needed in grams (A) as follows. First you will need to know the strength of your bleaching powder (see # 1 above). If B is the quantity of active chlorine needed (in this example 0.5 g) and C is the percentage of Cl in the bleaching powder (in this example 69.6%), you can calculate the amount of bleaching powder as A = B x 100 ÷ C. In this example, you would therefore need to measure out 0.5 x 100 ÷ 69.6 = 0.72 g of bleaching powder.
4. You now have the amount of active chlorine that you need (0.5 g) for the decapsulation process for 1 kg of cysts. SOURCE: DERIVED FROM VAN STAPPEN (1996) AND MORETTI, PEDINI FERNANDEZ-CRIADO, CITTOLIN AND GUIDASTRI (1999)
TABLE 6 ANNEX 4
Measuring the level of chlorine in commercial liquid bleach or bleaching powder
1. Dissolve 0.5-1.0 g potassium iodide crystals (KI) in 50 ml distilled water and add 5 ml of glacial acetic acid (CH3COOH), or enough to reduce the pH to between pH 3.0-4.0.
2. Add 1.0 ml of either the commercial liquid bleach (NaOCl) or 1.0 ml of a solution which you have made of the bleaching powder [consisting of 15.00 g of the bleaching powder (Ca(OCl)2) in 100 ml of distilled water]. 3. Using standard 0.1N sodium thiosulphate (Na2S2O3. 5H2O), titrate (away from direct sunlight) until the yellow colour of the liberated iodine has almost disappeared, add 1 ml starch indicator21, and titrate until the blue colour disappears.
4. Calculate the level of active chlorine in the bleach solution. 1 ml of 0.1 N sodium thiosulphate = 3.54 mg active chlo rine.
5. Example of calculation for commercial liquid bleach: if 33.5 ml of sodium thiosulphate are required to reach the end point of the titration, there is 33.5 x 3.54 = 118.59 mg of active chlorine in 1 ml of the commercial bleach solu tion. The level of active chlorine in the liquid commercial bleach is therefore 118.59 x 100 ÷ 1 000 = 11.9% Cl.
6. Example of calculation for bleaching powder: if 29.5 ml of sodium thiosulphate are required to reach the end point of the titration, there is 29.5 x 3.54 = 104.43 mg of active chlorine in 1 ml of the solution of bleaching powder which you made for the titration. The level of active chlorine in the original bleaching powder is therefore 104.43 x 100 ÷15 ÷ 1 000 x 100 = 69.6% Cl.
SOURCE: DERIVED FROM VAN STAPPEN (1996) AND MORETTI, PEDINI FERNANDEZ-CRIADO, CITTOLIN AND GUIDASTRI (1999)
21 prepare starch solution by mixing 5 g of starch (C6H10O5)n with a little cold water and grind in a mortar; pour into 1 L of boiling distilled water, stir and settle overnight; use the clear supernatent, preserved with 1.25 salicylic acid (C7H6O3) and store in a dark bottle.
TABLE 7 ANNEX 4
Procedure for hatching Artemia cysts and harvesting nauplii
1. Set up the hatching tank.
2. Stock the hatching tank with (decapsulated) cysts at a density of 0.25-1.00 g/L. As described earlier, you must determine the HE before deciding the actual quantity of cysts you need to use.
3. Incubate for 22 hours (it is essential for the BSN to be harvested when they are still energy-rich; older BSN would need feeding to maintain their nutritional quality for feeding to freshwater prawn larvae).
4. When ready to harvest the BSN, stop the aeration, cover the top of the tank to exclude light and focus a strong light source (say a 150 watt lamp) near the bottom of the tank to attract the BSN to that area. Fit a flexible hose to the out let of the tank and run it to the harvesting container which contains seawater and has an internal 125-150 µm mesh filter.
5. Purge the bottom tip of the tank of any unhatched cysts by opening the drain valve or removing the drain plug for a few seconds.
6. Not later than 5 minutes after stopping aeration (longer will cause oxygen depletion), start to collect the hatched BSN in the filter (see step 4 above) by gravity flow, by opening the drain valve or removing the drain plug. During the harvesting process, the dissolved oxygen level must not be allowed to fall below 2 ppm. Some hatcheries inject pure oxygen to raise the DO2 level to 10 ppm before harvesting to ensure that levels do not fall too low during har vesting. Do not drain the hatching tank completely or you will also collect any empty shells which may be floating on the surface of the water. You may find it useful only to harvest the tank partially; then wait another ten minutes for more BSN to accumulate near the light source, and harvest again. Be careful not to let the hatching tank drain faster than about 100 L/minute; watch carefully so that you do not clog the screen and lose BSN into the surround ing water of the hatching container.
7. Rinse the BSN thoroughly (about 15 minutes) to wash out the hatching debris. Either seawater or freshwater is suit able for rinsing.
8. Place the BSN from the filter into a temporary aerated container with a known but small volume of filtered sterilized 12 ppt brackishwater. This enables you to minimize the transfer of seawater to larval rearing tanks with the BSN and accustoms the BSN to the larval rearing salinity. It also enables you to calculate the amount to add to each freshwa ter prawn larval rearing tank at each feeding time, as described in the manual under hatchery procedures. Ideally, you should estimate the quantity of BSN present now, so that you can determine how to feed your prawn larvae the correct amount. However, in routine practice (and if you have added a quantity of cysts based on your measurement of the quality of each batch of cysts that you purchase) this may not be necessary.
9. Feed the BSN to the prawn larvae as soon as possible (with the minimum transfer of water). 10. If the BSN are not going to be fed immediately, store them in another aerated cylindrico-conical storage tank con taining filtered and sterilized seawater and adjust the water volume to a known level to give a maximum density of 4 million BSN/L. Keep the water temperature cool (5-10°C) with sealed ice bags to retain the nutritional quality of the BSN. This inhibits moulting, thus conserving energy and maintaining the nutritional value of the BSN for fresh water prawn larvae.
11. Start a new batch (repeating steps 1-10), so that you have BSN ready for tomorrow’s feeding. The number of batch es you need at any one time, and the time of day to start the hatching process for each BSN batch depends on the number of freshwater prawn larval cycles you have in your hatchery and the larval stage that each batch has reached. Remember that you will be starting to reduce the number of feeds of BSN from day 5 onwards and that, by day 10 you will only be feeding BSN in the evenings.
SOURCE: DERIVED FROM VAN STAPPEN (1996) AND MORETTI, PEDINI FERNANDEZ-CRIADO, CITTOLIN AND GUIDASTRI (1999)