3.4 TECHNIQUES – STANDARD PROTOCOL FOR REARING CALICO AND ZIGZAG SCALLOP LARVAE
The rearing of calico scallops was developed and well tested at the Bermuda hatchery between 1999 and 2003. The procedures developed give satisfactory results with respect to both larval yields and shell growth rate. In 4 years of hatchery operation yields of D-larvae for calico scallops determined per spawn, ranged from 29.3–58.1 percent, and yields of pediveligers ready for settlement were in the range of 17.8–55.4 percent; pediveliger yields are calculated as percentage of Day-2 D-larvae.
(Note: Throughout the following sections, Day-2 larvae refer to straight-hinge D-larvae developed two days after fertilization). These yields are in accordance with results obtained by other authors for pectinid species; Rupp (1997) reported a 12.5 percent pediveliger yield for Nodipecten nodosus, Uriarte et al. (1996) report a range of 17.6–27.8 percent for Argopecten purpuratus, and Couturier, Dabinett and Lanteigne (1996), report 50 percent for P. magellanicus. On the other hand, zigzag scallop yields are generally lower, and are indicative of the greater sensitivity of this species to handling and bacterial contamination. The range of D-larvae obtained from the number of fertilized eggs was of 0.96 to 49.2 percent per spawn over four years of operation, and for pediveligers of 2.1 to 11.7 percent.
Shell growth rates, vary among pectinid species, ranging from 4.8 µm.day-1 for a cold water species such as the rock scallop (Bourne, Hodgson and Whyte, 1989) to 14.8 µm. day-1 for the tropical scallop N. nodosus (DeLa Roche et al., 2002).
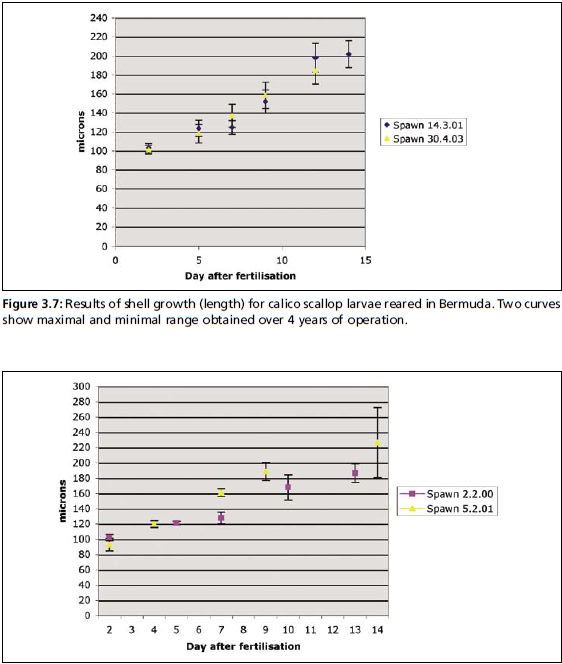
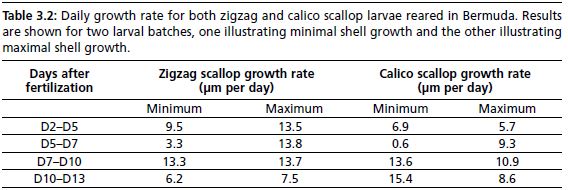
A mean growth rate of 10 µm.day-1 is strived for, when rearing both calico and zigzag larvae in Bermuda; this is a relatively fast growth rate when compared to other pectinid species. Throughout the larval life, shell length and height are measured routinely at every water change to assess the state of the larval culture. Figures 3.7 and 3.8 provide shell growth data for calico and zigzag scallops reared in routine hatchery operation. Data shown is a summary of results from the past four years of operation, illustrating the maximal and minimal shell growth curves for batches with average yields. Shell length of Day-2 zigzag larvae range from 93.1±83.1 µm to 113.3±4.3 µm. Pediveligers for this species reach shell length of 161.3±22.5 µm to 226.6±45.9 µm. For the calico scallop, Day-2 larvae have a shell length of 92.7±4.7 µm to 102.9±4.5 µm. Pediveligers for this species reach shell length of 184.2±14.0 µm to 203.5±16 µm. Pediveliger shell length is lower than that reported in the literature for the same species (Costello et al. 1973). This may also be attributed to the fact that settlement was usually initiated as early as possible to avoid sticking of pediveligers on the sides of the culture tanks. For this reason, shell length provided here, may underestimate maximal pediveliger size.
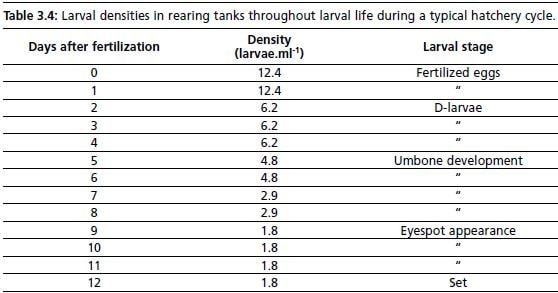
Daily growth rate for the same larval cycles as in Figures 3.7 and 3.8 are shown in Table 3.2. For both the zigzag and calico scallop, the differences in overall shell growth

Figure 3.7: Results of shell growth (length) for calico scallop larvae reared in Bermuda. Two curves show maximal and minimal range obtained over 4 years of operation.
Figure 3.8: Shell growth (length) for zigzag scallop larvae reared in Bermuda. Two growth curves show maximal and minimal length obtained over 4 years of operation.
between a “good” run and a “bad run” can be attributed to the slow growth rate at the beginning of larval life between Day-5 and Day-7. Both the shell length curves and the daily growth rate can be used as a standard range for future hatchery rearing of these species.
Table 3.2: Daily growth rate for both zigzag and calico scallop larvae reared in Bermuda. Results are shown for two larval batches, one illustrating minimal shell growth and the other illustrating maximal shell growth.

3.4.1 Larval rearing procedure
In light of the in-house studies described above, a standard procedure was developed and adhered to for the rearing of calico and zigzag scallop larvae in Bermuda. The more conventional static rearing system is routinely followed, where square 1 000 litres capacity tanks with lids, are preferred mainly due to their insulation characteristic. This allows for rearing of larvae at a temperature higher than ambient. Temperature fluctuation within larval tanks does not exceed ± 0.5°C between water changes. (Note: The changeover to flow-through system is considered, but the purchase of new tanks is necessary for this). Rearing temperature is 24±1 °C and salinity is ambient (36 ppt) from the egg stage to settlement stage. Water change is conducted three times a week; at this time, larvae are collected on two sieves of differing mesh size, such that fastest growing larvae are separated from the slower growing or dying larvae. Collected larvae are transferred to temporary containers (10 litres buckets), while tanks are cleaned and re-filled with treated seawater. Any assessment of larval culture is done during this transfer period. Once tanks are ready, larvae are re-distributed, often pooling larvae of similar size into one tank. Beginning Day-2 after fertilization, a small supply of air is given to the larvae, via a small diameter air tube, reaching the bottom of the larval tank (see technical drawing – page 13). The air supply, controlled by a labcock ball valve, is turned on low to only allow one air bubble at a time. Feeding of larvae is provided in a single batch at the same time each day, and after re-distribution of larvae during water change days.
3.4.1.1 Water change
The schedule followed pertains to a working week from Monday to Friday; although feeding and routine checks are conducted daily (including Saturday and Sunday), water change days are avoided over the weekend. Spawns are conducted as outlined in Chapter 1 (Protocol–4), preferably on a Wednesday; the reason for this is related to the length of the larval life (12–14 days). Depending on batches, larvae are ready to be set either on Day-12 or Day-14 after fertilization. Spawning on a Wednesday, results in Day-2 larvae to be distributed on a Friday, and “Setting Day” to be either on a Monday (Day-12), or a Wednesday (Day-14). In this way, any mortality due to delayed set is avoided. Water change days are therefore, Monday, Wednesday and Friday.
Initially Day-2 D-larvae are collected on 40 and 60 µm sieves. Depending on batches, a certain percentage of larvae are large enough to be collected on a 60 µm sieve; however, for the most part, healthy D-larvae are collected on a 40 µm sieve. Some variations are seen among tanks at times. Any abnormal larvae or undeveloped eggs either pass through the 40 µm sieves to drain, or are thereafter discarded should they prove to be the majority of the collected larval culture. Pull-down, or take-down, of tanks is conducted slowly, to avoid crushing of larvae onto the sieves or damage to the shells. For a 1 000 litres tank, 45–60 minutes is allowed for take-down. The model hatchery has four 1 000 litres larval tanks, take-down is initiated at 30-minute intervals to minimize transfer period for each larval batch. Each larval tank is attributed a number (LI to LIV), facilitating the tracking of larval cultures.
Protocol–11 outlines the details for taking-down of larvae; this applies at every water change; the only difference being the increasing mesh size for larvae as they grow and develop. Table 3.3 is a summary of mesh sizes used throughout larval development for calico and zigzag scallops, as well as the relationship between mesh size and larval size. Throughout tank pull-down, larvae are maintained in water, to avoid dehydration; for this reason, sieves are suspended in a tray, and submerged in seawater. Once a tank is completely drained, a thorough rinsing with filtered seawater is done with a gentle flow to ensure that any larvae collected in corners and drain is washed onto the sieves. Once all larvae are collected from the larval tank, immediate transfer into pre-cleaned 10-litre
Table 3.3: Relationship between mesh size and larval size retained on it as well as mesh sizes used specifically for the sand scallop and the calico scallop throughout larval development.

buckets allows larvae to remain suspended; larvae collected on different mesh size sieves are transferred into separate containers. Buckets are labeled with the larval tank number and size of mesh upon which larvae are retained. Holding of larvae in buckets should not exceed one hour; this is a stressful period for larvae and diseases that may be present could spread rapidly. Samples are taken at this time for counting of larvae. For re
distribution, larvae of similar “health” and size fractions are pooled; if a culture contains a greater percentage of dead or abnormal larvae than healthy larvae, it is discarded. [Note: Other hatcheries perform bacteriological tests to assess the health of larval cultures; as for example, is reported by Neima and Kenchington (1997), who take samples and plate them on CBS and Marine Agar using standard bacteriological procedures. From these plates, they perform a microbiological screening for a yes/no response. Results of this screening are used to make decisions regarding combining groups of larvae on subsequent change days or discarding larvae). Larvae are passed through a large mesh sieve (300 µm) for elimination of debris as they are distributed into larval tanks. To avoid damaging larvae, the previously cleaned sieve is held in the larval tank so that the mesh is submerged, and contents of the transfer bucket are gently poured through it. To ensure that all larvae are transferred, the holding bucket is rinsed with filtered seawater and its contents poured through the sieve; this rinsing process is repeated twice.
At the time of distribution, the number of larvae per tank is recorded along with density and volume of water in tank. On a daily basis, routine checks are made at the very beginning of the day and records are made on the hatchery check sheets provided for each tank. Appendix 15 provides a sample check sheet. During these checks, air supply is verified, ensuring that flow is not too high or stopped; temperature of the tanks is recorded and care is taken to clean the thermometer between each tank to avoid contamination; any observations related to the state of the culture, for example detritus on the bottom, is written on the check sheet and algal food ration and composition provided are recorded for each tank.
Sieves required throughout larval and post-larval cultures can be made using available materials. Large diameter pipes can be cut and transformed into sieves by gluing fine mesh on one end. Details of construction are given in Appendix 17.
PROTOCOL–11
TAKE-DOWN OF LARVAL TANKS: LARVAL COLLECTION AND REDISTRIBUTION
1. Backwash as per Appendix 6.
2. Do routine checks of broodstock, larvae, post-larvae and algae.
3. Set-up Heating Unit as per Appendix 4.
4. Rinse 1 µm filter, filter housing and 20 mm inner diameter hose with fresh water. Set up second 1 µm filter onto appropriate fittings above larval tanks. Adjust 20 mm ID hose to filter via hose barb (see technical drawing – page 13).
5. Clean sieves and support rings to be used by scrubbing with a cloth soaked in chlorinated fresh water and rinsing well with fresh water.
6. Clean 4 trays similarly (same trays as used for spawning).
7. Remove 4 hose fittings from chlorinated bin and rinse thoroughly with fresh water. 8. Adjust each labeled hose fitting to respective larval tank. Set up one tray per tank. 9. In each tray, place larger sieve on top of ring so that mesh of sieve is not in direct contact with bottom of tray, and that larvae do not get damaged against tray surface. 10. Suspend smaller diameter sieve into large diameter sieve using a 15 mm pipe. Be careful, smaller diameter sieve, has larger mesh size. Large larvae are collected first; small larvae pass through and collected on second large diameter sieve.
11. Fill tray with filtered seawater. Make sure collecting hose is inside smaller diameter sieve.
12. Open valve of larval tank slowly and ensure that a gentle flow of water occurs. There should not be any air bubbles coming out due to vigorousness of flow.
13. Once first tank is 1/3 down, start second tank.
14. Repeat procedure with all larval tanks.
15. Once all water is collected from the larval tank, rinse sides and bottom of tank with filtered seawater. In this way you are ensuring to collect all larvae.
16. Finish off by washing down drain with filtered seawater.
17. Carefully remove the hose from the sieves.
18. From smaller diameter sieve, wash larvae carefully into a previously cleaned bucket with a gentle flow of filtered seawater from a 20 mm ID hose. Preferably use heated seawater (same temperature as larval rearing temperature).
19. Label bucket with larval tank number and mesh size collected.
20. Place in secure place for counting and shell growth determination.
21. Clean larval tank by rinsing with a vigorous jet of fresh water.
22. Close drain valve, fill bottom of tank with approximately 50 mm of fresh water so that drain area and all corners are submerged. Add one capful of commercial bleach and leave for 10 minutes.
23. Use scrub brush and with chlorinated water scrub sides of tanks and bottom thoroughly.
24. Drain chlorinated water and rinse completely with fresh water including rinsing of lid. 25. Do one final rinse with filtered seawater.
26. Start filling tank with heated seawater to desired volume.
27. Adjust airflow so that air is supplied one bubble at a time.
28. Count collected larvae in buckets and determine survival and shell growth of larvae as described below (see Section 3.4.1.4).
29. Once tank is filled pool larvae according to size and health of culture.
30. Re-suspend in larval tanks maintaining an adequate density (see Table 3.4 below). 31. For re-suspension, pass larval culture through a pre-washed 300 µm sieve held at surface of larval tank so as to remove any debris in culture.
32. Feed larvae as required (see Table 3.5 below and Protocol–12). Replace lid.
33. Once all larvae are re-suspended, clean hatchery as outlined in Appendix 7.
3.4.1.2 Standard rearing density
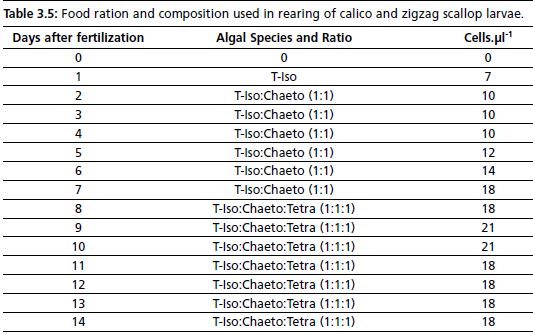
Larval density within one tank, does not exceed 8 larvae.ml-1 initially, and 5 larvae. ml-1 towards the end of larval life. Densities gradually decrease with length of larval period as larval mortality naturally occurs. Tank volume is adjusted at times in order to maintain a density of larvae appropriate for growth. Typical densities throughout
larval life are given in Table 3.4. As larvae approach metamorphosis, lower densities (1–2 larva.ml-1) are found more favourable to growth and development.
Table 3.4: Larval densities in rearing tanks throughout larval life during a typical hatchery cycle.

3.4.1.3 Standard food ration
Food ration and composition given during standard hatchery procedure is given in Table 3.5. The first ration of food is provided at the first appearance of veliger larvae (24–48 hours after fertilization). Consequently to food ration studies conducted in-house (see section 3.3.4.1), algal food ration is increased on Day-9 and Day-10 of larval life.
Table 3.5: Food ration and composition used in rearing of calico and zigzag scallop larvae.

3.4.1.4 Counting larvae and determining survival rate and shell growth
To determine survival rate, counting of larvae in a sub-sample is done following transfer to the holding buckets. Larvae are gently mixed using a homemade plunger (see Appendix 8). Thorough mixing is obtained by a continuous up and down motion with the plunger, taking care not to touch the bottom of the bucket, to avoid crushing larvae, and staying below the surface of the water, to prevent any splashing or bubbles, which may be damaging to the larvae. During mixing, aliquots of larvae are sampled using an Eppendorf pipette. Aliquots of 1 ml are placed onto a Sedgewick Rafter Cell, and fixed with two or three drops of 10 percent formalin. Counts are made systematically by moving from one end of the grid, scanning the slide up and down to the other end. For larvae located on lines of the grid, care must be taken not to count them twice. Triplicate aliquots are taken for each larval fraction. To determine survival, the average number of larvae counted in three aliquots is calculated, and used in the following equation:
Total number of larvae collected =
Average (larvae per ml) x Volume of seawater in bucket (ml)
During routine hatchery procedure, the same aliquot of larvae used for assessing survival is used for assessing shell growth; length is defined as the maximum distance across the shell, parallel to the hinge; height is perpendicular to length, being the maximum distance from the hinge to the edge growth. Measuring 20 larvae, usually gives a good indication of growth rate between water changes. Comparisons are made with growth curves given in Figures 3.7 and 3.8. For any scientific studies however, a minimum number of 50 larvae should be measured. In the hatchery, a compound microscope using an ocular micrometer is sufficient for assessing length; some hatcheries have access to more sophisticated equipment, such as an image analysis program connected to a camera. Although these are extremely useful in detailed scientific studies, they are not necessary for routine assessment of growth.
3.4.1.5 Setting of larvae
The detailed procedures for setting larvae and post-larval rearing are given in Chapter 4. Determining maturity of larvae and readiness to set is discussed in this section as the conclusion to larval life. As larvae approach metamorphosis, selecting the right day for initiating settlement is crucial. The reason being that if larvae are ready to settle, but maintained in larval tanks, high loss of pediveligers will most probably occur. This loss may be due to two factors. The first is linked to the substrate search behaviour of pediveligers, which will lead them to settle on the sides of the larval tanks; they then, become difficult to dislodge, and become damaged in the process. The second factor is the occurrence of high mortality in metamorphic larvae observed when left too long in larval tanks. In order to avoid this loss of pediveligers, certain criteria are followed at the hatchery in Bermuda to decide whether or not larval batches are ready for settlement.
This set of criteria includes size, morphology and behaviour, and is similar to that used by other aquaculturists for the determination of mature larvae. Bourne, Hodgson and Whyte (1989) found that mature Japanese scallop larvae are 260–280 µm in shell length, and collected on a 180–200 µm screen; this is similar to size criteria for P. magellanicus
(Neima and Kenchington, 1997). The presence of a well-developed foot, developing gill bars and eyespots approximately 10 µm in diameter, aid in the identification of mature larvae. Neima and Kenchington (1997) calculate percent eyespots and foot activity in samples for a more accurate determination. Eyespots are not as conspicuous in all pectinid species, as is the case for calico scallops, and may be difficult to use as a criteria for these species. A change in larval behaviour, from continuous swimming to periods of swimming interspersed with periods of crawling with the foot on a substrate, is most important. At this time, larvae are often collected from the bottom of larval tanks, rather than from the surface layers, unlike during the earlier stages of larval life. In holding containers, mature larvae will often clump together to form mucous strands in the water. This behaviour is called “rafting” and is a sign of healthy and vigorous larvae that are ready to metamorphose.
Criteria used for initiating settlement at BBSR are:
1) Active substrate-search behaviour of larvae, with foot extension and crawling observed when larvae are placed under the microscope.
2) Clinging of larvae to each other when they are in the transfer bucket; this “rafting” behaviour creates a very distinct line formation.
3) All larvae are collected on 120 µm and 150 µm mesh sieves, with the greatest majority on the latter. Mean shell length ranges from 180–200 µm for calico scallops, and 180–225 µm for zigzag scallops. Because not all larvae develop at the same rate, the smaller size fraction may be kept in a larval tank for a further two days prior to setting. This has occurred several times in Bermuda, with comparable settlement and post-larval development of the smaller size fraction (and delayed set) to the larger size fraction.
If these observations are made, it is best to initiate settlement in larvae and end larval rearing. If not, an additional two days in larval tanks is preferable for a better settlement yield. Chapter 4 describes various methods for setting of mature larvae and their subsequent post-larval requirements.