NET CHANGING
Net changing is routine maintenance activity that has to be planned, scheduled and organized efficiently.
A logbook should bek ept with the number of working days (number of days in the water) for each net. A limit should be set on the number of days in the sea for each net, defined on the basis of the fouling characteristics of the site, and this should be strictly followed. Each net must be tagged on arrival at the farm site with a unique code. The main information to be recorded in the net logbook should include: Code number: code for each net.
Design: shape (e.g. if cage shapes other than circular are used on the farm), number of vertical ropes, any other relevant details.
Size: volume, circumference, wall depth, base cone depth.
Supplier: net manufacturer.
• Delivery date.
• Netting characteristics: mesh size, mesh shape, breaking load, material and colour.
Antifouling: whether the net is treated or not, and date when it was last treated. Days in the water: number of working days of the net, if used more than once. Repairs and patches: any relevant repairs done on the net.
Test date and result: when the last strength test was performed and the verified residual breaking load.
• Current location: location of the net, on which cage it is currently installed and its location in the depot.
One or more divers are usually required for changing large nets. Smaller nets may be changed using only surface staff. Depending on the net size and the amount of biofouling, a boat with a suitably sized crane may be used. A square metre of net can weigh up to 10-15 kg (out of the water) if it is not changed in a timely manner. Heavy fouling is possible, especially if nets are not treated with antifoulants.
Preliminary actions in net changing
The new net must be fully inspected on land to check for manufacturer faults or repair mistakes. There is no point in exchanging a dirty net for a faulty one. Attachment lines must be checked and fastened on the attachment loops.
All the required equipment must be carefully checked (crane lines, scuba gear, rope slings, etc.).
• Anti-predator nets should be removed in advance from the cage where the net will be replaced.
Net detachment
The attachment points on the fouled net are untied from the cage in the following sequence:
? sinkers;
sinker tube;
connections along the sinker ropes;
cage collar attachment points.
Note: The net is now secured through the top rope onto the handrail only.
Positioning the new net
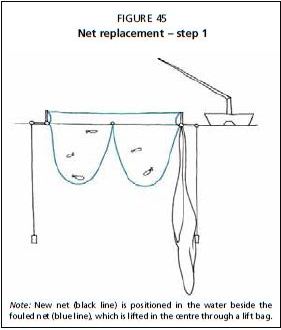
The new net is dropped into the water on the up-current side of the cage.. The bottom of the fouled net is lifted with a lift bag (Figure 45).
• Divers draw the new net underneath the fouled net.
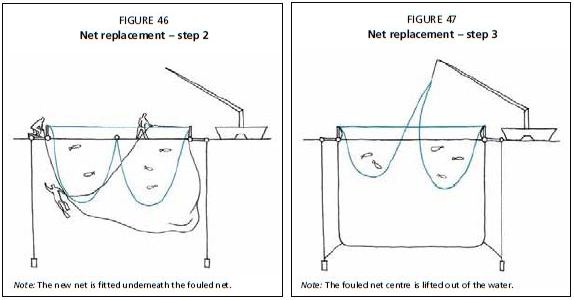
The new net is gradually raised by the surface workers and by divers underwater. Surface workers can help the divers by hauling on lines to pull the new net underneath the fouled net (Figure 46). • When the new net is in place underneath the fouled net, surface workers fasten the attachment lines of the new net onto the handrail.
At the end of this phase, both the new net and the fouled net are only attached onto the cage handrail. The fish are completely contained by both nets. It is necessary to ensure that the new net is well attached before removing the old net.
Removal of the fouled net
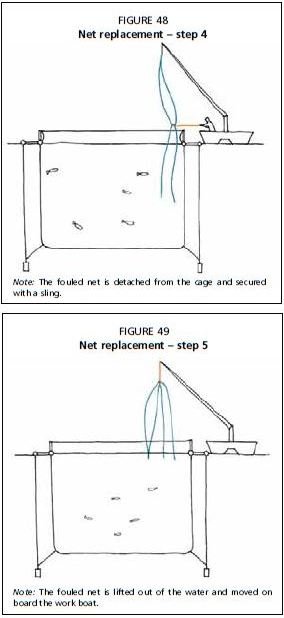
The fouled net base is lifted out of water and fastened onto the crane hook with at sling (Figure 47).
Using the winch, further slings are tied onto the net base below the first sling.
Note: Net changing or installation should not be performed during adverse weather or current conditions.
New net attachment
This operation can start before the removal of the fouled net.
The new net needs to be fixed to the following attachment points: cage collar;
? sinkers;
sinker tube.
This operation is usually carried out by divers, who attach the base net to the sinker system. It may be problematic if these attachments are made when a strong current
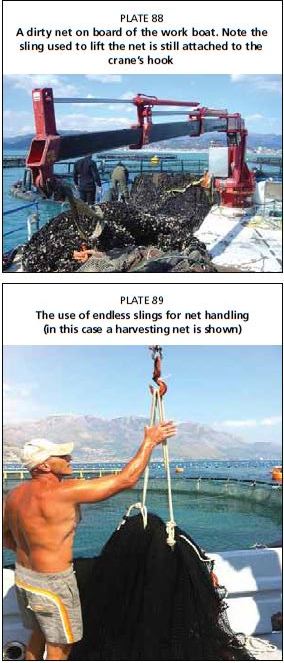
Once a large portion of the fouled net is out of the water, the jump net is unfastened from the hand rail (Figure 48).
The fouled net is then pulled out of the water and loaded on board the work boat, paying attention that there are no fish trapped in the fouled net (Figure 49 and Plate 88).
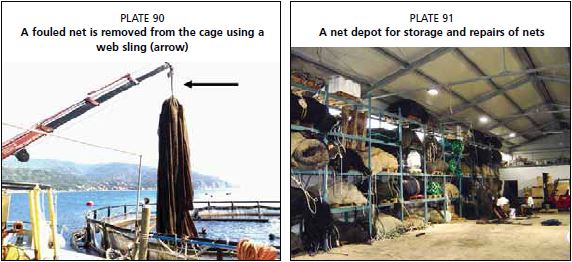
The use of web slings or endless slings is recommended for better net handling and removal (Plates 89 and 90). Endless slings may be made by splicing two ends of the same rope together, or commercially produced endless slings can be purchased.
is flowing at the site, because the net will be under load and the attachments will be difficult to connect.
Net maintenance on land
Once the net is removed from the cage, it is transferred onto land.
If the net is to be cleaned with a high-pressure cleaner, it has to be dried first. The fouled net is left in an open space for drying, preferably spread out over the ground. If the net is to be cleaned using a net washing machine, drying is not necessary but preferable. Repeated or prolonged use of high-pressure cleaners may damage the nets over time. Repairs on the cleaned net will be done after cleaning, and will include the removal of all the plastic ties and the net mending, including replacement of ropes as needed. A residual net strength test should be performed, with the use of a net strength gauge, and the data updated in the net logbook. If the residual net strenght is below 60% of the initial breaking load value, the net should be replaced.
At the end of this process, the net is folded and stored in a warehouse, avoiding direct exposure to sunlight (Plate 91).
Net washing machine
Net washing machines are used to clean dirty cage nets once these are removed from the cages (Plates 92-95). There is a wide variety of models and sizes, but the principle is always the same: the cleaning action is obtained through the friction resulting from
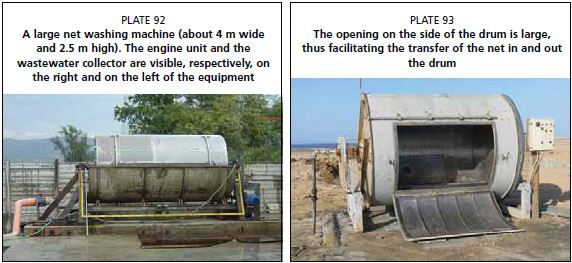
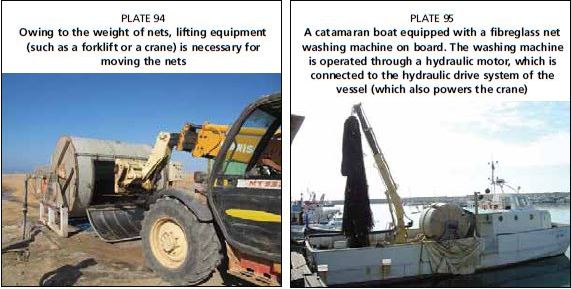
the movement of the nets. Only water is added inside the drum while it is rotating; no additional soaps or cleaning products are required.
The resulting wastewater, containing the dead fouling organisms removed from the net, needs to be treated, at least through a sedimentation tank, before being discharged back into the sea.
It is preferable to dry the dirty nets before they are washed, as this makes the cleaning action more effective.
Net washing machines are usually made of stainless steel, and consist of the following main elements:
A main frame that supports the drum axle. An additional stainless steel tank below the drum may be installed on the frame to collect the wastewater that drips from the drum (Plate 92). This tank is usually in the shape of a half cylinder, and envelops the lower half of the drum.
A rotating drum. This has a large volume (several cubic metres), sufficient to contain the largest nets used on the farm. (Note: biofouling increases the volume and weight of the nets dramatically.) A large, lock able door is located on one side of the drum (Plate 93). The drum is usually rotated at a speed of 5-8 revolutions per minute (rpm). The dinty nets are usually placed in the drum with a forklift or crane (Plate 94).
An engine unit. This can be either electric or hydraulic powered. The engine is connected to the drum through a gear system, which increases the engine power while reducing the revolutions per minute of the drum. Hydraulic motors are preferred if the net washing machine is installed on a boat, where the hydraulic motor can be connected to the hydraulic drive system of the vessel (Plate 95). A control panel with a safety switch is connected to the engine unit.
A water supply. This is a pipe connected to a dedicated pump that provides water through a water inlet into the drum. The inlet is usually a hole in the drum axle, opposite the engine axle.